

Friday, December 29, 2017
Making a Round Thing Square
Well, actually, making a round thing rectangular. I had an idea for a way to mount hood straps on the Beck TD, but after making the first piece I decided to go a different direction. But the process of making one was instructive, and I thought someone might stumble upon this post and learn from my fumbling around. Here's the final result:

Friday, December 22, 2017
Beck TD, Part 14: A Slightly Less Suicidal Door
I've spent about 10 hours over the last three days correcting three separate problems with Beck's driver-side door, and have learned a ton about how it all works. I also learned why every web article I had read about adjusting those doors said it was a real pain! But I persevered, and had a lot of success. Here's the door after all the work:


I know it just looks like a door, but it's a lot better! Compare it with this, clipped from an older photo. You can see that the door didn't fit well at all, with an increasing gap from top to bottom.
Thursday, November 30, 2017
Beck TD, Part 13: The Remote Shifter
Since Mark Harnitchek, the prior owner of the Beck TD, is an upright guy, he disclosed in our initial conversations that the shifter had a problem. It was difficult to find gears, and very balky. In addition, it was the "tractor style" shifter from the PV544 - hard to deal with.


Saturday, November 18, 2017
Beck TD, Part 12: First Drive!
After several months of work, Beck TD has taken its first drive under my ownership! Cool!


There's even a brief video:
Friday, November 17, 2017
Beck TD, Part 11a: UPDATE on A Recalcitrant Brake
-In Part 11, I described a week's worth of work trying to discern why the reassembled brake drum was dragging on the driver's side. I included that post in a message to the Volvo-Engined MGs Group. I was surprised this morning by a 7:00 AM call from Cor Engelen, one of the group members who helped me get the car back home from Virginia. He had seen the post, and noticed this picture:

Continue on to Part 12....

He said, "Those nuts should be on the back side! Those are special low profile bolts, and if you turn them around the hub will clear just fine." Good to know!
I don't even feel bad about this, because I wasn't the one who made that mistake - the prior owner had already assembled the backing plates before the project stalled. In fact, I'm kind of glad it happened, because the Grant Street Garage gained a new press as part of the proceedings, and I learned a ton about using it, and about drum brakes in general.
So... both sides come back apart to fix that, and then we're really back on track!
Thursday, November 16, 2017
Beck TD, Part 11: A Recalcitrant Brake
Way back at the beginning of this saga in Part 1, I told how we cobbled together the front suspension just enough to push the Beck TD onto a trailer for its trip home from Virginia. Ever since, that loosely assembled suspension, with no brake shoes in the drums and nuts just finger tight, has waited for its turn. And it finally came!
The first order of business was to take everything apart. That was just straightforward mechanic work, but the brake drums were a trial. It turns out that MG designed the hub that holds the wheel bearing as an integral part of the drum. The internet was full of stories about how hard it is to get apart. Back in the day, MG dealers had a special tool, but those are long gone. I wound up creating a wooden extension that bolts to the brake drum and allows a modern two-jaw puller to be used:

The first order of business was to take everything apart. That was just straightforward mechanic work, but the brake drums were a trial. It turns out that MG designed the hub that holds the wheel bearing as an integral part of the drum. The internet was full of stories about how hard it is to get apart. Back in the day, MG dealers had a special tool, but those are long gone. I wound up creating a wooden extension that bolts to the brake drum and allows a modern two-jaw puller to be used:

Thursday, October 19, 2017
Beck TD, Part 10: Coupling the Steering
When I installed the steering rack using custom hardware in Part 8, I didn't mention that it wasn't quite done. There's a part called the "pinion shaft flange" that isn't included on the new rack, and in fact, is not available for purchase due to the difficulty of manufacturing it. The flange looks like this - it's the one I removed from the old rack:


Sunday, October 8, 2017
Beck TD, Part 9: It runs!
Well, when you have important news, start at the end: it runs! It runs! It runs!


Friday, October 6, 2017
Beck TD, Part 8: Getting Close!
In the last post, I described some custom nuts and washers for mounting the new steering rack and the front body pan. After posting, I did a bit of cleaning and painting, and started putting things back together. I quickly realized that I needed one more bit of lathe work to get the steering rack reinstalled - some heavy steel washers to use with the Grade 8 socket head cap screws I had chosen:


Friday, September 22, 2017
Beck TD, Part 7: Custom Stuff
Some days, you just don't feel like getting dirty. And some days, you just want to play with your home shop machinist stuff - the milling machine and lathe. I know you all have felt that from time to time.
Today was that day, and I had something specific in mind. In Part 6, I was grumbling about inaccessible nuts and bolts while digging my way down to the steering rack. I decided to do something about it.
Today was that day, and I had something specific in mind. In Part 6, I was grumbling about inaccessible nuts and bolts while digging my way down to the steering rack. I decided to do something about it.
Monday, September 18, 2017
Beck TD, Part 6: Digging Deeper
After getting the radiator modified in Part 5, you would think that I would have put it in right away and finally started the engine. However, I realized that if I did that, I would have to take it all apart again in order to install the brand new steering rack that prior owner Mark gave me. Far better to dig deeper and replace that before putting the cooling system back together.
To do that, you first must detach the rack from the frame, and that was the first trial. Those nuts and bolts were seriously inaccessible. In this photo, I drew a circle around the back bolt head. No room to move a wrench to get it from below, although I did need to keep a wrench on it to keep it from turning. I guess the British hadn't invented captured nuts in 1952.
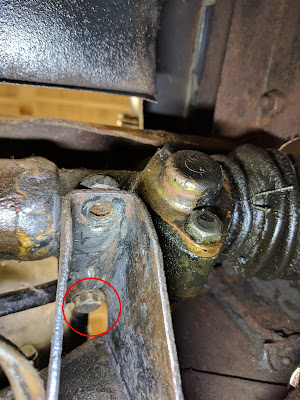
To do that, you first must detach the rack from the frame, and that was the first trial. Those nuts and bolts were seriously inaccessible. In this photo, I drew a circle around the back bolt head. No room to move a wrench to get it from below, although I did need to keep a wrench on it to keep it from turning. I guess the British hadn't invented captured nuts in 1952.

Tuesday, September 12, 2017
Beck TD, Part 5: Rectifying the Radiator
In Part 2 of this saga, I left things in a bit of a mess, and then teased you with two subsequent posts that didn't even mention the problem. To remind you, after assembling the engine side of the cooling system and installing the radiator, I was left with a significant mismatch in the outlets, and a clearance problem between cooling fan and the lower radiator outlet. Here's that photo again:


Wednesday, September 6, 2017
Beck TD, Part 4: Fun With RPM Numbers
Cor Engelen and I have been having a conversation off-list about rear gear ratios. I know the stock TD ratio of 5.125 to 1 is too low (numerically high) for our powerful Volvo engines. Charlie Baldwin and Joe Lazenby solved the problem with overdrive transmissions, but Cor went with a 3.9 to 1 ratio out of an MGA. He reported that it works well.
I found a nicely priced used rear end on eBay today, and after showing the auction to Cor and conferring with the seller that the rear was complete, I bought it. Just one more project in a mountain of projects, but that's why I bought this car, after all.

I found a nicely priced used rear end on eBay today, and after showing the auction to Cor and conferring with the seller that the rear was complete, I bought it. Just one more project in a mountain of projects, but that's why I bought this car, after all.

Sunday, September 3, 2017
Beck TD, Part 3: History!
I have been doing some research on the Beck's Brewery TD, trying to figure out its history. While on vacation, I spent a lot of time on the web after returning to the hotel each night, trying to find something. I found no mention in the Internet record, but I did find an interesting link. I remembered that the car is wearing a sticker for the South Jersey region of the Sports Car Club of America, region 84.


Monday, July 31, 2017
Beck TD, Part 2: Taking Stock and Getting Started
I sure was excited after getting the Beck's Brewing MG TD (hereinafter called "Beck TD") into the Grant St. Garage in Part 1. The only small problem is that we left it pointing the wrong way! A couple of days later, John Zimmerman and Mark Forsha and I were having lunch, and I imposed on those guys to help me push the car back and forth to turn it around. Once done, I got it into the air:


Saturday, July 22, 2017
Finger Treadle, Part 4
At the end of Part 3, I stated that I wanted to finish the Finger Treadle in time for a library demo on July 22nd. That's today, and I had it finished with time to spare! No more need to show you a photo from a magazine - here's mine, and I'm quite pleased at how it turned out:


I even made a brief video showing the treadle in action:
Sunday, July 16, 2017
The Beck's Brewery MG TD, Part 1
Well, now I've done it. I went and bought a car even older than I am! It's a 1952 MG TD, converted to racing spec some decades ago. Part of that work was to install an engine and transmission from a period Volvo - a very common modification in the 60's and 70's that doubled the horsepower. Here's a photo sent by Mark, the prior owner, when it was all together:


Monday, July 10, 2017
Finger Treadle, Part 3
Man, this "simple" project seems like it's taking forever! Of course, it was probably designed to occupy, for example, a high school shop class for an entire semester, so it takes the time it takes. Just for consistency, here's the photo from the original plan one more time:


Wednesday, July 5, 2017
Finger Treadle, Part 2
In Part 1 of this series, I got started on a machinist's training project called a "finger treadle." Here's the picture again, from a 1991 issue of Projects in Metal, to jog your memory:


Thursday, June 22, 2017
Finger Treadle, Part 1
You know what a treadle is, right? It's usually foot-powered, and converts an up-and-down motion to a rotary motion. The classic example is a treadle sewing machine:


Wednesday, June 21, 2017
The Marquis de Lafayette
Mary Ellen and I have just returned from a little three-day trip to Cape May, NJ, and I'm going to take a departure from my regular blog subjects to do a little travelogue with lots of pictures. We hadn't been to Cape May in over 20 years, but remembered it fondly for its gentle beach atmosphere and the lovely Victorian homes everywhere in town.
Another thing I like about Cape May is that, although it is a "resort" destination, it doesn't have the draw of the nearby casino cities, and therefore has been ignored by the corporate chains. All of the beachfront hotels date from around the 50's and 60's, and we decided to return to one that was a faded gem even 20 years ago: the Marquis de Lafayette. This is a two-star hotel in modern ratings, but it is large, spacious, scrupulously clean, and right in the middle of things:

Another thing I like about Cape May is that, although it is a "resort" destination, it doesn't have the draw of the nearby casino cities, and therefore has been ignored by the corporate chains. All of the beachfront hotels date from around the 50's and 60's, and we decided to return to one that was a faded gem even 20 years ago: the Marquis de Lafayette. This is a two-star hotel in modern ratings, but it is large, spacious, scrupulously clean, and right in the middle of things:

Monday, June 12, 2017
A Sticky Light
This little guy is the JANSJÖ LED Work Lamp from Ikea. It's standing in its own spotlight, so to speak:


Sunday, May 14, 2017
Kate's MG, Part 11... Sold!
Well, this is the last post of the thread for Kate's MG, because it has sold! Tomorrow, it will become "Brian's MG." The saga of that sale has been quite interesting. In Part 10 I linked to a for-sale ad I had done with a ton of detail, and then I created a Craigslist ad that had lots of good pictures, and referenced that blog post.
I'll tell all about that in a minute, but I'll get to the good part first. Today was a gorgeous afternoon, with bright sun and perfect temperature, so I was very happy to drive the MG to the outskirts of Lancaster to meet Brian. I took a picture of the car in the Giant parking lot on Centerville Road where we met, grateful that the car is now running well.

I'll tell all about that in a minute, but I'll get to the good part first. Today was a gorgeous afternoon, with bright sun and perfect temperature, so I was very happy to drive the MG to the outskirts of Lancaster to meet Brian. I took a picture of the car in the Giant parking lot on Centerville Road where we met, grateful that the car is now running well.

Wednesday, May 3, 2017
Kate's MG, Part 10
Kate's MG has had its visit to John's garage, and greatly benefited from it! John is passionate about auto detailing, and has a couple of shelving units crammed with products from Griot's Garage and other purveyors of fine auto finishes. Since he was so instrumental in helping with the fuel system problems, I offered to help with the detailing, even though I HATE washing and polishing cars.
We started with the trunk and interior. I was happy to see that the trunk was totally solid, with no rust:

We started with the trunk and interior. I was happy to see that the trunk was totally solid, with no rust:

Sunday, April 30, 2017
Kate's MG, Part 9
At the end of Part 8, I was impatiently waiting for carburetor parts from Virginia-based Moss Motors. In actuality it only took a week, and most of that was not Moss' fault. I ordered the parts on a Saturday, and they shipped Monday morning, via USPS. Not UPS, but the post office. According to the post office tracking site, the parts sat in the Richmond, VA postal facility for about four days! But finally they were delivered yesterday, and today after church I got right to work. This little pile of stuff is what $100 worth of MG carburetor parts looks like:


Monday, April 24, 2017
Kate's MG, Part 8
In Part 7, I ran out of time after building a nifty carburetor stand for the SU carbs on Kate's MG. The next day I went back to the shop to try to figure out why the front carb was running a steady stream of gasoline out of the overflow vent - the open brass pipe in the picture below. I suspected it had to do with some binding in the float, and sure enough, with a bit more cleaning and adjusting, I was able to get the float to hang normally:


Friday, April 21, 2017
Kate's MG, Part 7
In Part 6, we learned that the front carburetor had an incontinence problem - it wanted to run gas out the front! That's almost always a problem with the float or needle valve, so I pulled the carbs one more time:


Tuesday, April 18, 2017
Kate's MG, Part 6
Today's post is a mixed bag, but heavily biased to the positive! Let's call it 10 steps forward, and only two back.
As promised in Part 5, today's work was to get a real mechanic involved to assess the basic safety of this MG. I just didn't feel qualified to give it a clean bill of structural health, even though my investigations made me very hopeful. John Zimmerman and I had lunch, and then he agreed to follow me to Lancaster Mitsubishi, my local garage of choice. That seemed like overkill, but during the 2-mile trip, the MG started running very poorly and smelled very strongly of raw gas. I was glad to have the insurance of a rescue wagon behind me!
As promised in Part 5, today's work was to get a real mechanic involved to assess the basic safety of this MG. I just didn't feel qualified to give it a clean bill of structural health, even though my investigations made me very hopeful. John Zimmerman and I had lunch, and then he agreed to follow me to Lancaster Mitsubishi, my local garage of choice. That seemed like overkill, but during the 2-mile trip, the MG started running very poorly and smelled very strongly of raw gas. I was glad to have the insurance of a rescue wagon behind me!
Saturday, April 15, 2017
Kate's MG, Part 5
In Part 4, it was obvious that we were close to having a driveable MG. Without further ado...
For email subscribers, this link: https://youtu.be/KAj-Tb9fj3c
Tuesday, April 11, 2017
Kate's MG, Part 4
At the end of Part 3, I said the next task was the brakes. It was, but I didn't go nearly as deep as I thought I might. I was able to free up the stuck pad without removing the caliper, and called it good for now. I have been obsessing about the elephant in the room - the rusted sills on the MG. There were pictures from the outside in Part 1, but without further inspection, I can't know if the car is even safe to drive. There is visible rust from the front wheel well to the rear wheel well on both sides, and in the area called the "dog leg" right in front of the rear tire, there's a good-sized hole on each side. Here's the driver's side:


Monday, April 10, 2017
Kate's MG, Part 3
Just a quick post, with more good news! I ended Part 2 with a list of work to do next, and the very first thing was to installed the roller wheels on my EZCarlift so I could rotate the MG 180 degrees. John Zimmerman was once again available and willing to help, so off we went. You have to remove the wheels and tires from the car, which required a BIG breaker bar - some garage monkey had really hammered the front wheels on. But eventually, the car was ready to rotate:


Sunday, April 9, 2017
Kate's MG, Part 2
Part 1 got the car to the Grant St. Garage and gave some initial impressions. Now, it's time to dive in. I'll start with the good news: it runs! Here's the video:
Friday, April 7, 2017
Kate's MG, Part 1
My good friend Kate has owned a 1974 MGB for many years. It was her fun driver in grad school in Washington, DC, and for some time thereafter. But, in a typical "ran when parked" story, it gradually became unused, and for the past 5+ years has sat in the corner of the barn like this:


Monday, March 27, 2017
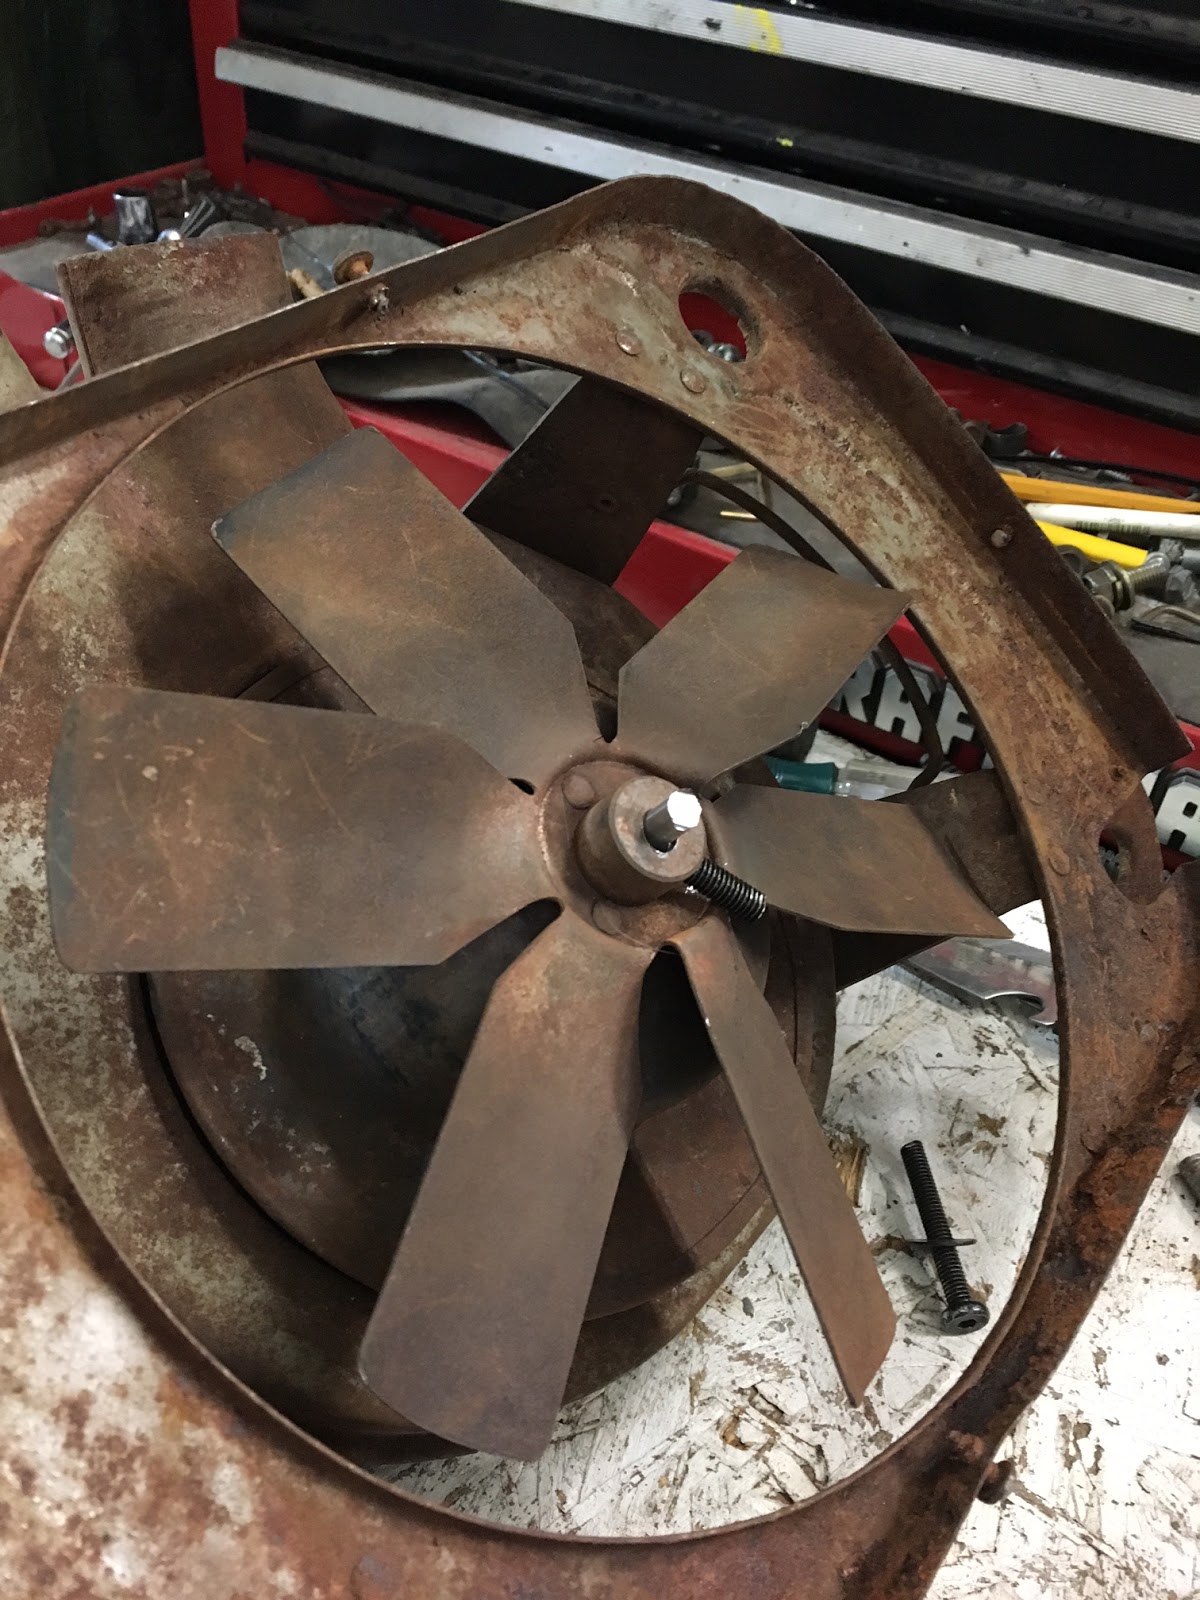
Bob's Friend's Fan
Bob Zimmerman is no stranger to the Grant St. Garage - he's the Master Electrician who wired the entire garage, adding a dozen 6-bulb fluorescent fixtures, a quad electrical outlet every 4 feet, two breaker boxes, 220V wiring for big equipment, and more. He's also been involved in some automotive projects, and there was this crazy project to rebuild a barn-find cabinet for his wife, Sharon (link).
The other day, Bob sent me this picture, and asked if I could fix that worn, out-of-round hole in the fan:

The other day, Bob sent me this picture, and asked if I could fix that worn, out-of-round hole in the fan:
Friday, March 17, 2017
The Taming of the Screw, Part 2
In Part 1 of this saga (link) I detailed a great online resource called Clickspring, and the "Screwhead Holding Tool" I decided to make. Well, it's done, and I learned a lot of new techniques getting there! Since in the last post I had a picture from the Clickspring site of what it "would" look like, now I'll show that picture (left) vs. my version (right):


Friday, March 10, 2017
The Taming of the Screw, Part 1
Apologies to Shakespeare for the pun in the title - couldn't resist! As I am progressing from beginner to not-quite-beginner in this machinist stuff, I've had two major mentors to follow. The first is my friend Phil Oles, a model engineer whom I have mentioned many times in this blog. The second is a craftsman I'm unlikely to ever meet, since he lives in a remote part of Australia. His name is Chris, and he has a YouTube channel called Clickspring (that's part of a clock) where he demonstrates the most exquisite machine work on clocks and other mechanisms.
Chris has a website as well (www.clickspringprojects.com) and a Patreon channel where I help support Chris' work and as a result gain access to videos and tips not available to the general public. You can do it for as little as a dollar a month - quite a deal.
I decided that a project on Chris' website called a "Screwhead Holding Tool" would be a nice one to have, and push my skill level that tiny notch forward. Chris didn't post a detailed plan, just photos, so part of the exercise is figuring out how to make it. Since mine is still in progress, I'll borrow a finished picture from Chris' site to show what it should look like:

Wednesday, March 1, 2017
Dealing With Drawer Slides
In my recent second post about my new rolling drill press table (link), I stated that there would be a part three, in which I added a drawer base to the table. I made the base, but it's just a bit boring and straightforward to actually write about. But during that process, I decided that I would figure out once and for all how to space drawer slides without a lot of trial and error. This photo from the rolling cart (link) for small parts and fasteners that I made for Make717 will show the issues involved:


Friday, February 24, 2017
Going Digital, Part 2
In Part 1 of this saga, I installed iGaging digital readouts (DROs) on the Y (in-out) and Z (up-down) axes on my mini-mill. I saved the X axis (left-right) for last, because it's the most complicated. Phil Oles and I had decided that the best place to install the track was on the front of the mill, to avoid compromising the already-limited travel in the Y direction. But that adds a lot of complications, because there is already a lot in the way there. Here's a photo of the mill table - the DRO track needed to be mounted along the length of the table.


Friday, February 17, 2017
Going Digital, Part 1
I have the great good fortune to be the choir director for two really good church choirs at Lancaster Church of the Brethren - the Chancel Choir and the Carillon Bell Choir. These folks are talented, hard-working, good-natured, caring and generous! And their generosity evidenced itself this Christmas with an extravagant gift of cash to me. I was humbled and deeply appreciative. I told them that I would spend the money at the Grant St. Garage.
Part of the money went to upgrade my table saw dado set to a much better one (this one), and the rest went toward this: a set of three iGaging Digital Readouts for my milling machine. Digital Readouts are universally abbreviated DRO, and pronounced "dee-are-oh", not "dro."

Part of the money went to upgrade my table saw dado set to a much better one (this one), and the rest went toward this: a set of three iGaging Digital Readouts for my milling machine. Digital Readouts are universally abbreviated DRO, and pronounced "dee-are-oh", not "dro."

Friday, February 3, 2017
Drill Press Table, Part 2
In Part 1 of this saga, I detailed how I had spent hours milling quarter-sawn lumber from 2 X 12 framing lumber for a bottom-weighted rolling table for my drill press, and the pluses and minuses of the technique I chose. Now, let's use that stock to build the table, starting with the legs. They have open mortises at top and bottom to create what is called a bridle joint. This one is unusual because the joint is so wide - six and a half inches. Here are two legs done, and two more in clamps after gluing:


Wednesday, January 11, 2017
Drill Press Table, Part 1
I've had a multi-year goal of getting all the equipment at the Grant St. Garage on wheels. It just makes it so much easier to rearrange and clean up. I've made good progress, probably averaging one piece of equipment per year, but I've always dragged my feet about doing it for my drill press. The reason is that it's so top-heavy. It would be very easy to make a dangerous situation while trying to move it.
Recently, I noticed a plan from ShopNotes magazine that solves the problem in a way that's obvious in retrospect: add a lot of weight at the bottom to counteract the heavy drill press head at the top. Here's a photo from their plan (from Issue 38, apparently now available only on DVD):
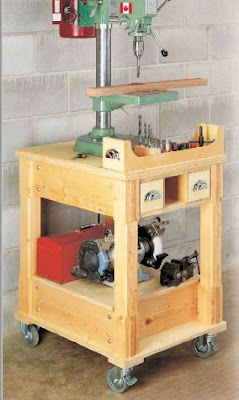
Recently, I noticed a plan from ShopNotes magazine that solves the problem in a way that's obvious in retrospect: add a lot of weight at the bottom to counteract the heavy drill press head at the top. Here's a photo from their plan (from Issue 38, apparently now available only on DVD):

Subscribe to:
Posts (Atom)