

At the end of that first post, I had noted a few problems with the hex-shaped "cap" that was the first part of the build - specifically, the top I had chosen was too thick, and the corners lacked the neat chamfer that the Clickspring version had. That's where I decided to continue, figuring out how to do those chamfers. The photo below shows how I used the 3/4" threaded rod to hold the cap, and used a second 3/4" nut to lock it onto the shaft. I turned the compound on the lathe to a 30 degree angle with the handle rotated to the back, so it would move the right direction to make the chamfer:

You can just see that the chamfer worked, so then I removed the cap from the fixture to make it thinner before finishing the chamfer. I did that on the mill, and I knew that my screw heads would be milled away too. Therefore, I super-glued the brass top onto the nut, and reasoned that enough of the screw head would be left to hold it tight. I was wrong, but we'll get to that in a minute. Here's the milling, and the finished product. The stripes are the result of using multiple passes with an end mill to remove the material:

My goal was to make that brass top exactly 0.100" thick, but how could I check it once I was done? I came up with the idea of making a small post that the cap would fit over. Comparing the height of the post versus the height of the cap sitting on the post would give me the thickness of the top. The difference was about 0.1008" - a good validation of the accuracy of my new DRO's measurement!

Once that was done, I returned the cap to the lathe fixture and made the chamfers. It looked good, so I continue with drilling the 7/16" hole in the cap, making the final cut with an end mill to make a precise, concentric hole.

I thought the cap was done, but later testing found that the screw heads were too far gone, and the Super Glue wasn't strong enough. The top separated from the cap when I tightened it down. No problem - I used temporary pan head screws to hold it together for testing, and fixed it later.
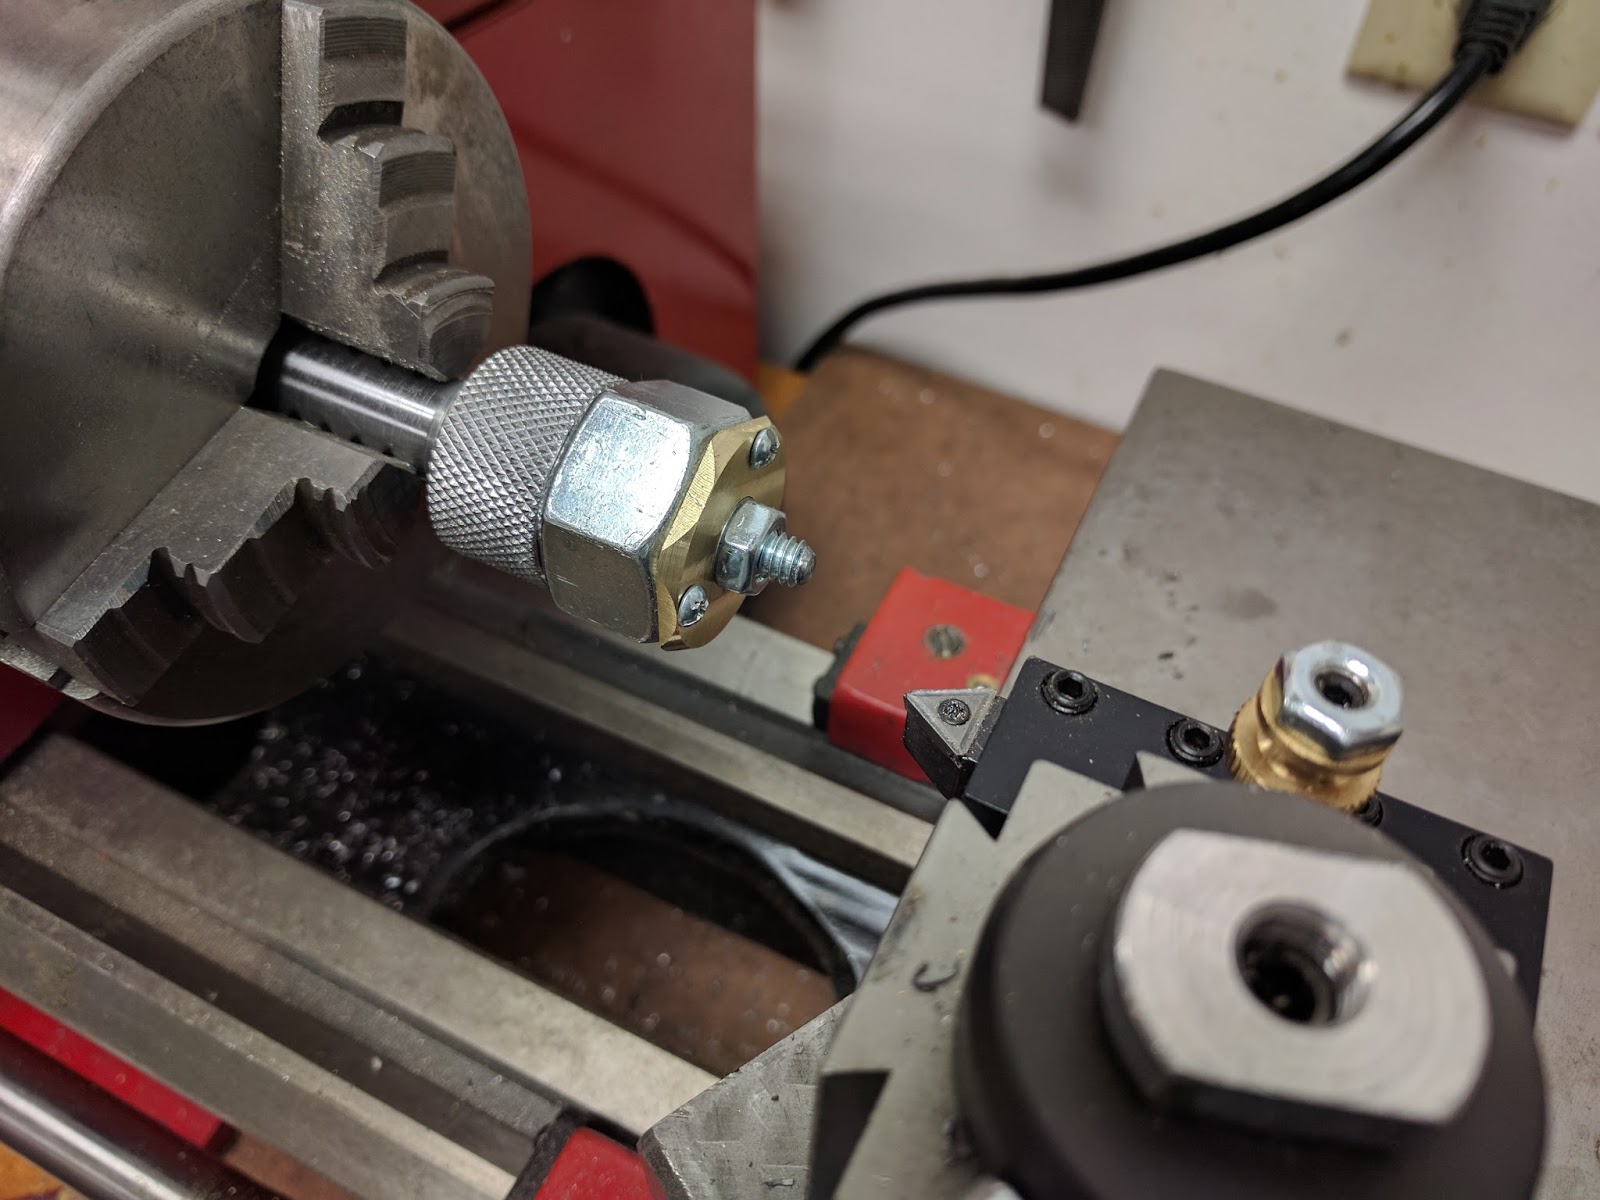
The next step was to create the "handle" out of a piece of 3/4" threaded rod. I faced both ends and center-drilled one to accept a live center like this:

From there, it was just careful turning to cut away the threads on the shaft portion. Cutting off threads like that is what machinists call an "interrupted cut" because the cutter has to skip through the gaps between threads. It's hard on the tool, so I made many passes with light cuts until it was done. A bit of filing and sanding cleaned up the shaft. I then made the first of what will be several "bushings" to mate various size screws. It was time for a test, and I shortened a 1/4-20 screw pretty easily:

To be honest, I was underwhelmed with the performance of the tool at that point. The cap was difficult to tighten on the shaft, and the screw wasn't held tightly in the bushing. I decided to make a knurled lock ring to better lock the cap in place. I started by locking two more nuts on another piece of threaded rod, and carefully turned the corners off the first nut until it was round:

I reset it on the fixture and faced and chamfered both ends, and then began to ponder how I would accomplish the knurling. I needed a spacer between the lock nut and the new round nut, so my knurling tool would fit. I didn't have a good way to cut that on the lathe, but then I remembered: I'm a woodworker too, and I have a 3/4" Forstner bit! I made a hardwood ring to make the necessary space:
I was kind of dubious about that, but it worked fine. The round nut measured 1.084". I used my Knurling Calculator app on my phone to determine the next lower size that would work perfectly with my 21-pitch knurls (turned out to be 1.076), turned the nut to that size, and knurled it:

I realized that the other problem, of the screw "squirming" in the bushing, could be tackled by adding a lock nut on the screw before putting the cap in place. That worked well too - here's the photo of that test, showing both the knurled lock ring and the lock nut on the screw:
That lock nut solution won't work for extremely short screws, but if I get into that situation, I can make a bushing tapped to the screw size, so that it can lock the screw.
Now it was time to get rid of those temporary pan head screws, and make the surface flush again. I returned the cap to the mill fixture where it was originally made, and drilled countersinks into each location, one screw at a time. I could then replace the screws with flat-head screws that would sit down in the taper of the countersunk hole:

Being doubly cautious, once that was done I disassembled the cap one last time, used more Super Glue to hold it in place, and also used Loctite 262 to lock the screws in place. One more pass on the mill to make sure everything was level, and I called it done:

I still need to make a lot more bushings. I may make them as blanks, and drill them to various sizes as I need them. All in all, a fun project and, I hope, one that will be useful in the future.
Very nice work
ReplyDelete