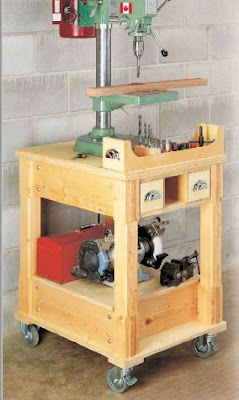
Recently, I noticed a plan from ShopNotes magazine that solves the problem in a way that's obvious in retrospect: add a lot of weight at the bottom to counteract the heavy drill press head at the top. Here's a photo from their plan (from Issue 38, apparently now available only on DVD):
The trick is that box at the bottom - it's filled with 100 pounds of sand! That will add a lot of stability, aided by the double-locking casters (locking both the wheel and the caster rotation). I decided to build one for myself.
I decided I wanted to try a technique I've read about multiple times to prepare the thick stock to make the table. It's desirable to use quarter-sawn stock in making something like this, both for the stability and for the look of the straight grain. The problem is that quarter-sawn stock is expensive, especially in thick lumber. The technique is to use relatively inexpensive framing lumber in wide widths, which is usually quarter-sawn on the edges, and only use the quarter-sawn parts. Here's an example:
To get the width needed in this 2 X 12 (actual measurement 1.5 X 11.5) sawmills usually have to use the center of the tree. See how the growth rings contain the tree's center in the edge of the boards? The center is really unstable, so it is basically scrap. If you're lucky, you can use 2/3 of a wide board like this.
The problem is that 2 X 12 lumber only comes in 16-foot lengths at Home Depot, so it's a big, heavy board! I was alone, which was a mistake. A store employee came over to help, and I just took the top two boards. As you can see, I got one with very good, tight quarter-sawn grain, and the other is fast-growth stock that is less desirable. I had the store crosscut the boards into two 8-foot lengths to get it back to Grant St.
I ripped the quarter-sawn edges off each board (the width varied by board) and crosscut them into rough lengths for the project. I wound up with some really good stock, and some just ok. Here are the pieces for the four legs:
The cost per board foot (12" x 12" x 1") was less than a dollar for the raw stock, but there's a good bit of waste when you throw out the unstable center of the tree. I made some firewood for a neighbor:
Of course, the design called for wider stock than I could get from those edges, so I had to glue up some boards. I used every clamp I had but about 2... there are seven panels being glued up in this picture.
After that, I had all the stock I needed for that table, and I could "take stock," so to speak.
What I decided was this: this is WAAAAY too much trouble! The boards still had a good many knots, and the grain, while straight, was not consistent in density. I spent 5-6 hours to save a few bucks. If it was the only way I could afford to do woodworking, it would be worth it, but since my time is so limited, it would make a lot of sense next time to spend more for vertical-grain fir, for instance.
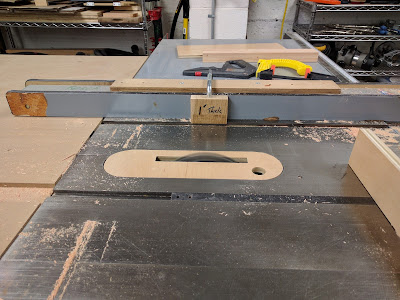
I'll end Part 1 of this story by cutting the first joints of the legs. If you look at the lead photo, you can see that the legs are made from two parts with open mortises to hold the rails. Those mortises are 6.5 inches long. The suggested way was to cut each side with a dado blade in the table saw, with a setup like this:
The stop block on the fence sets the depth of cut, and you clamp that first cut so it won't squirm. After that, you "nibble" the rest of the stock away - it take a bunch of passes for a dado this wide. Since my dado blade is cheap Harbor Freight junk, it left a scalloped surface like this:
The way to fix that is to reset the stop block so it aligns with the saw blade:
Then, I was able to very carefully make multiple passes across the blade at right angles until the the ridges are flattened out. It's not as scary as it sounds, because the leg is so long. My hands never came closer than about a foot from the blade. That yielded a pretty smooth surface compared to the one above:
This is not a quick process - it took 30-45 minutes to complete the first leg. Here it is clamped together so you can see what it looks like.
There's a mortise like that on both ends of the leg. Three more legs to cut, then glue them together. That will happen next week, I hope. Then, plenty more work to cut and fit the rails. Maybe I'll get this done before summer...


No comments:
Post a Comment