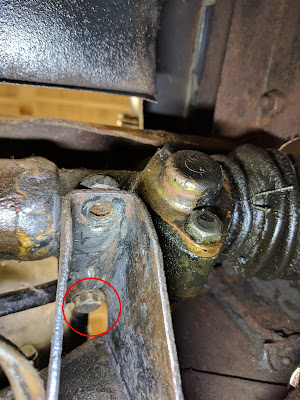
To do that, you first must detach the rack from the frame, and that was the first trial. Those nuts and bolts were seriously inaccessible. In this photo, I drew a circle around the back bolt head. No room to move a wrench to get it from below, although I did need to keep a wrench on it to keep it from turning. I guess the British hadn't invented captured nuts in 1952.
It took every extension and flex socket I own, but I was able to get reach the two rear bolts and remove them. The final one was at the front, and should have been easy, but I could not get it to turn. I finally removed the fan and other obstructions to clear my view, and I could see that some prior "craftsman" had coated it with J-B Weld, a strong and permanent metal epoxy.
I chipped off as much as I could and tried with all my might, but couldn't break it loose. I was actually sort of pleased, because you will see in a later post how I repaired a broken stud in the grill shell with J-B Weld. This improves my hopes that it will last! For this bolt, I had to drill it out.
Once the rack was free, the workshop manual has a clear procedure to remove a few obstructions, and then tilt the rack to remove it. That sure didn't work for me, and the Internet was unanimous in the assertion that it didn't work for them either. There were various ways suggested, including partially disassembling the brand new rack. Nope. I decided to go with the plan shipped with the rack, to remove the radiator lower mount instead.
To do that, first I needed to remove the front pan - the center part of the bodywork:
I was pleased to do that, because that's the smallest piece of painted bodywork, and I want to take that to a paint supplier to get it matched. I don't plan to paint the car, but I'd love some good touch-up paint for its many scabs. To remove that panel, you have to remove four screws (one already gone above), and some prior "craftsman" had replaced them with garden-variety carriage bolts. The nuts on the bottom were seriously inaccessible, and rusted to boot.
I found a useful tool at Harbor Freight for only $3.99 - a very short extension that has the 3/8" square to match a socket, and a 9/16" bolt head on the back side for a wrench. That takes a lot less space than a ratchet wrench, and it turns out that gave me just enough clearance.
I still needed to be able to turn it from the top, so I used my Dremel tool to cut slots in the round heads of the carriage bolts for a straight screwdriver. Two more came out with various degrees of difficulty, but the last one just wouldn't turn.
I got a bright idea, and turned a 3/4" spade drill bit into a wide screwdriver blade, so I could use an impact driver to "hammer" that bolt out.
It worked great, just as intended, but that bolt would not break loose no matter how much I hammered it! Maybe more J-B Weld hidden up under there? After several hours of trying, I wound up using the Dremel to cut most of the bolt head away, and then drilled out the rest. Here we are in progress:
I have to include this photo for documentation, because I will probably never again line up a drill by eye in a screw head, and so precisely hit center on the invisible bolt shaft below!
After that, it was the tedious but straightforward task of removing four bolts holding in the lower radiator mount, and then I could rotate the steering shaft and work that greasy, worn-out lump of a steering rack out of the car:
Now that there's plenty of clearance. I'll clean it up and paint some of the rusty bits, and then it's back together with new hardware. In this final photo, you can see that somewhere in its life, the car center-punched something immovable and bent the cross member. In an ideal world, I would do a body-off restoration and have a new cross member welded in, but I'm not going that far. This car is a driver!


No comments:
Post a Comment