
Beck TD has been a real joy this summer and fall, as evidenced by the lack of blog posts. Mary Ellen and I put nearly 1000 miles on Beck, cruising around the beautiful Lancaster County countryside. But finally it got too cold, and since Beck was running very well... I tore the engine apart! Idle hands are the Devil's workshop, or something like that.
Its job is to pull the fiber cam gear off the Volvo engine I'm using in Beck. He even found me a source for the tool, at this link:


I needed a center hole for the screw, and three precisely placed holes for the puller arms. I measured the holes in the gear in a pretty standard way: I measured the shortest distance from the inside edges of two holes, and then the longest distance to the outside edges. The difference, divided by 2, should be the diameter of one hole. I measured the hole and it matched well enough. Calculating the distance between centers of those two holes gave me 2.95", and since calipers are tough to get exactly precise, I was willing to believe that some 1950's engineer specified 3" on center between those holes. I plugged that into a good online triangle calculator:


There were only two problems. The first, I hope, is temporary - it was out of stock, with no specified date to be back in stock. The other was that with tax and shipping, it cost the thick end of 50 bucks. I started looking around for a way to roll my own. I found three matching 5/16" bolts in stock, and was pleased to see that my homemade bending jig on the 20-ton press made quick work of bending them to shape:
Next, I used a machinist's height gage to mark the spot I wanted to cut on the bandsaw, ensuring they were identical.
Soon there were three identical pullers done.
Next task was to find some suitable steel to make the body of the puller. All I could come up with was a rusty scrap piece 1/2" X 4" X 5.5", pretty much the minimum size to make it. Fine. I used carbide tooling to make it shiny again.
There will be a hole at each point of the triangle, and one at the center for the screw. The Side measurement (a) is the distance I measured between two hole centers. The "Circumcircle radius" calculation is the one that we want - it tells how far from the center I should drill the holes for the puller arms.
This is where the Digital Readout (DRO) on my milling machine is so handy. I defined a center point on my stock, and then told it that I wanted a bolt circle with three equally spaced holes on a radius of 1.732" and a starting point of zero degrees, along the X axis. Since I was feeling a little unsure, rather than immediately drill my only piece of steel stock, I cut a matching piece of plywood and made a prototype, and was pleased when it fit the gear just as I wanted.
Back to the steel, I drilled it to match using the same DRO program, marked the triangular outline, and moved to the bandsaw for some rough cutting.
Time spent on various sanders yielded a jewel-like piece that is definitely too nice for a workshop gear puller...
One more thing to do - provide screw threads for the center screw to turn in. For that, I used a special "weld nut" since I have a whole box of them. The shoulder and scallops on the edge give a good place to weld. I hit it with the MIG welder and called it done.
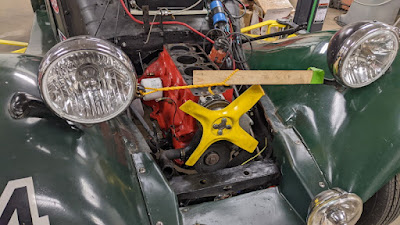
Here's the puller in place on Beck's original engine, which is still taking up floor space in my shop.
And... BOOM! Well, actually, squeak... squeak... squeak. Since that shaft isn't tapered, there wasn't a moment where the gear popped off. I just turned the center screw and the gear gradually worked its way off the cam.
I love it when a plan comes together! Later, I made an optimization to the puller to make it even easier to use. The knurled knob on one leg makes it easy to release and rotate it for ease of installation, and then align and retighten. I used it in that form on the engine in Beck and it worked great to remove that cam gear also.
Now you can use that $50 to put gas in the tank and still have money left over for lunch for you and Mary Ellen. I spent $40 for a wrench to remove the universal for my Riviera. Used it once and now it's in the drawer hopefully never to be used again.
ReplyDelete