Way back in Part 17, I got the speedometer working with a new custom cable that matched the Volvo transmission to the MG instrument, along with a repair to the speedometer gear in the trans. However, the tachometer was a more difficult nut to crack. Unlike all modern tachs, the 1952 MG version was cable driven, just like a speedometer. Worse yet, it was driven by a special gearbox that lived on the back of the generator on the engine. Since Beck has been converted to Volvo power, that generator/gearbox no longer exists, and there was no way to drive the tach.
But I wanted a tachometer! I believe the very first customization I ever made was back around 1971, when I added a cheap steering column-mounted tach to my little Datsun wagon. Every car I've had since has had a tachometer. I started the Internet research.
The very best possibility would be to pay a company called Nisonger Instruments to convert my tach to an electronic drive, and restore the gauge face at the same time. Of course, I would want to restore the speedometer at the same time so they would match. I didn't get a quote, but reading what others have spent makes me believe the cost would be over $1000.
The fancy instruments in the later TD like Beck have never been reproduced by the aftermarket, but I can get reproductions of the earlier flat-faced instruments from Moss Motors. They look good, but the price for both is $800.
Incidentally, the Moss clock is a fake, "guaranteed to be accurate twice a day!" At that price, might as well get the fancier stock instruments done. But... not yet. I have too many other things to spend money on first. I decided to try to fit a "temporary" tach, but done nicely so I wouldn't have to hang my head in shame when people saw it. I started with removing the old tach, and it was startlingly easy - it didn't even take tools. Given that a used tach of the later style on eBay sells for hundreds of dollars, I carefully wrapped it in multiple layers of bubble wrap, boxed it up and stored it in a safe place.
I later revised that drawing slightly. Here's the corrected version - click it for full size:
Then began a long process of turning a 1/8" aluminum plate into the mounting ring. In the photo below, you can just see the two threaded holes for the mounting studs, and I just finished boring a 3/4" hole dead center.
I moved to the band saw, and trimmed off the corners of the ring. I then moved to a sanding disk to further round off the corners.
The 3/4" hole was to mount on a custom mandrel I made on the lathe. Once mounted, I could finish turning the plate round:
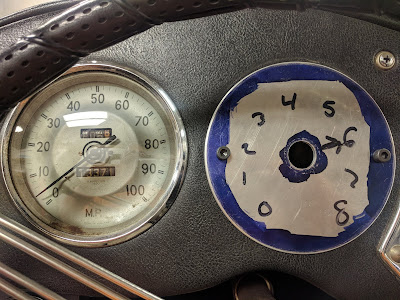
Once that was done, I tried it to make sure it was going to fit. I couldn't resist giving it a face - probably the only time Beck TD will see 6000 RPM!
After that, I went to visit my friend Phil Oles, whose name appears with great regularity in this blog. Phil has some nice gear, including a rotary table. The tach body is 3-7/16" in diameter, so I needed a matching hole in the plate. We started by aligning the work piece on his rotary table, and then used a 3-1/4" hole saw to remove most of the material.
Once that was done, Phil installed an end mill, carefully aligned it, and rotated the table through 360 degrees to complete the hole.
That worked great, but then I realized that the stamped body of the tach wasn't perfectly round, and also tapered out slightly at the top. I returned to the Grant St. Garage, mounted the ring on my Logan lathe (which I bought from Phil), and bored the hole a little bigger. Success!
I sandblasted the ring and then painted it with a black textured paint. I hoped the texture would make it match the vinyl dashboard better. I installed it, hooked up the wiring I had previously run, and it worked!
Stepping back a few feet, it doesn't look so bad. It even matches Beck's rough-and-ready racer vibe. "Temporary" is kind of open ended, but I do hope to eventually have the original tach and speedo restored and converted. But for now... I have a tach!
Continue on to Part 33...


Personally, although the new tach is not consistent in appearance with the old speedo, you have more of a story to tell about how you fabricated the fixture to hold it. The alternative story is...I bought this authentic looking speedo online and plugged it into the dash.
ReplyDelete