Here's an old picture of my prior engine that clearly shows the carbs. I added some annotation numbers for reference. You may need to click the picture to expand it to see them clearly.
1. The choke cable passes through here on its way to the linkage.
2. The linkage - it is pulled up by the cable to actuate the choke.
3. The jet tube - when the linkage is pulled up, this moves down to enrich the mixture.
The left-hand carb has a mirror image of that setup also, and you need two cables to actuate both sides.
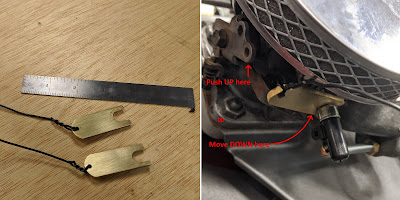
In the original MG TD engine, the choke mechanism worked totally differently, so it wasn't easy to adapt. In fact, Beck's was missing altogether when I bought it. For a long time, I used these shims to actuate the choke, which worked fine, but required that I manually insert them when starting the cold engine, and then remove them after 30 seconds or so.
Again, click to enlarge to read the annotation - it makes the linkage a bit clearer. I finally got tired of that song and dance, and decided that the quarantine time was the perfect time to fix this once and for all. I enlisted the help of my friends on the Volvo-engined MG Group, and got several pictures of their implementations. I also did other research and experimentation, and gradually came up with a design. And it works! It looks like this:
The single cable to the left goes to the knob. That cable pulls the square block, which pulls the two cables on the right side to actuate the two choke linkages. Since my hobby is making stuff, I decided I would make as much of it from scratch as possible, starting with a leftover BMW hood latch cable I had floating around in the shop. I cut it in two to make the two cables to the carbs.
The rest of this post will detail all the pieces I made, in the order I made them. Since I didn't start with a finished design, often making one piece would inform the next step to take. I began with this little piece called a "trunnion" - it captures a cable and holds it tight in a linkage:
There was only one problem - I had two carbs, but only one trunnion. I checked the scrap box, and came up with a hex brass shaft out of a handbell.
As part of my "day job" I conduct a good handbell choir (hear them at this link). Like all mechanical things, handbells wear out, and most often at the "clapper" that rings the bell. In the photo above, you can see where it broke at the axle shaft. After some drilling, tapping and turning, I had two trunnions instead of one!
Next, I modified some standard 5/16-18 bolts to function as adjusters for the linkage. The big hole at the head fits the cable sheath, and the smaller through hole lets the cable through.
Those adjusters need something to thread into, so next I made the "twin cable block," which has tapped holes on the back side to mount it.
The dimensions of the twin cable block informed the rest of the design, so I took the time to draw it. Expand to read...
The BMW cable had pre-formed "pills" on each end, and I created a "cable receiver block" to hold them, with a single hole with set screws for the cable going to the knob.
Finally I was ready to make the bracket to marry all these pieces together. It is made of 3/16" steel, and this prototype worked but was too big to easily mount.
I later shortened and re-bent the bracket for the final form. I just became a senior citizen, and for my whole life, if I needed to bend steel it was a vise-and-hammer affair. But this time, I decided to make a tool I had seen on the web: a bending jig to use with the 20-ton press. I welded angle iron to a base to make a "V" form, and cut the bottom off a chunk of I-beam to make the press tool.
I was surprised how well it worked. Even this 1/4" steel bent without a struggle. It formed my bracket much more accurately than I could with a hammer, even assuming I could have moved that thick steel.
We're in the home stretch. I needed clamps to hold the cable sheath to the carbs. The larger hole slips over the existing posts on the carb, and the set screws hold that and the cable sheath together.
Like this:
I mounted the linkage on the tool box under the bonnet (in US English, the hood). Note that Beck TD had a significant modification there in the distant past. The tool box was shortened to allow room for a heater. Thus, that spot won't work on other TDs! The side of the battery box should work. This photo shows the knob pulled - the cable receiver block moves back and actuates the choke linkage.
And here's the proof - the choke linkage moved the jet tube down, no shims required!
As I said earlier, I did all this because my hobby is making stuff. If you don't want to make it, Lokar will sell you something rather similar for only $166.95 at this link. But I'm happy with mine - home shop engineering rules!


No comments:
Post a Comment