I've wanted to do something about my top radiator hose for years, ever since Beck TD came to the Grant Street Garage. The mechanic that converted Beck to Volvo power years ago apparently made several decisions based on what materials were at hand. For the top hose, he chose a brass plumbing fixture to convert the 2" hole in the TD radiator to the 1-1/4" needed for the Volvo engine. He chose a flex hose with dubious routing to get it all to work. In this photo, the valve cover is removed, giving a better photo of the whole routing:
UPDATE: Subsequent use in the hottest part of the summer found this system to still run a bit too hot. I'll leave this post here for its historical value, but in Part 85 I added a brand new radiator! END UPDATE
In that photo, you can also see the bright yellow Volvo fan, driven by the engine belt. It worked pretty well, but airflow was lowest right when you needed it to be highest, while sitting still. Since getting back to Grant Street after a cruise involves city traffic and red lights, the temperature would always climb just as I was preparing to put the car away.
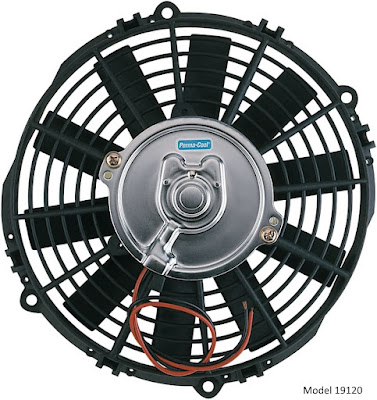
Jake Roulstone had already solved this problem over in California, and on his second try identified a great fan for the purpose. It is the Perma-Cool model 19120, a low profile fan that delivers 2350 CFM of airflow. Jake reports that there is a cheaper fan that looks very similar on his "wall of shame" - it looked great but didn't move nearly as much air. The 19120 is widely available for around $100. Warning: the model 19110 looks even better, with higher airflow, but it is thicker and won't fit. Ask me how I know!
I've learned to put myself in the mindset of the engineers who designed the equipment when measuring to fit. For example, this modern fan was designed in the metric system, and careful measurement put the on-center distance between mounting holes as 145 mm. I wanted to mount my custom brackets to the headlight cross brace in the TD, designed in England in the early 50's, and those holes were dead-on at 2" on-center.
I prepared a couple of plates of 1/8" thick aluminum, and used the milling machine to locate and drill the holes.
I made a template of hardboard, and traced it on the aluminum. My small vertical band saw was useful in cutting it out. Here, I'm making relief cuts in preparation to cutting that inside curve.
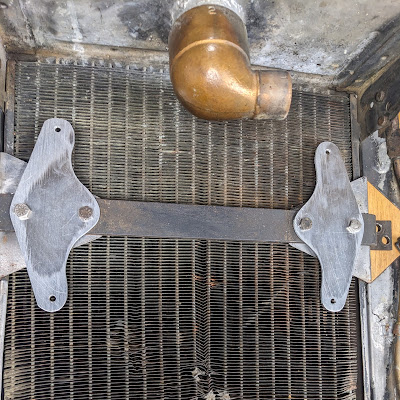
And here they are mounted on the radiator. This is a better view of that cockamamie plumbing fixture that made the upper hose outlet.
The fan fit just as planned. The coolant temperature is highest at the top of the radiator, so there is value in mounting it as high as possible. There's room to add a shroud around the fan if even more airflow control is needed.
Time for a test, using the powerful 12 volt bench supply I made in this post. In the left photo, you can see the fan holding a piece of cardboard tight against the radiator. On the right, the flapping towel shows the prodigious airflow.
I'll leave the measured drawing of the bracket here in case I need it later. On my milling machine's Digital Readout (DRO), it was convenient to do the measurements from a center point.
With the fan sorted, it was time to get the radiator modified. I chose Gerz Radiator, which has been in continuous operation for over 100 years in downtown Lancaster. It is definitely an old-school shop! David, the guy who did my work, showed me a picture of a brass-era car for which they had made a radiator from scratch, for the AACA Museum in Hershey.
Here's their card in case you need them.
You may remember from Part 79 my story of having to re-tap and plug the hole for the drain tap. Now it was time to fix it correctly, and have a new drain installed. To the right of that, I had David add another tap for a temperature switch to control the fan. Often, those sensors are in the top tank, but I put it in the bottom at Jake's recommendation. I also followed his suggestion to use a sensor that turns on at 180 degrees and off at 165 degrees.
It took me a couple of tries, working with Gerz, to get this exactly right, but the final arrangement of the hose outlet looks like this. David sealed the original 2" hole, and added the 1-1/4" outlet facing down.
All I need now is a short, straight piece of hose. You can also see the new fan, and the start of the fan wiring. There's a relay on the firewall, and in addition to the temperature sensor, I added a hidden switch in the cockpit so I can turn the fan on manually if I wish.
I had the first test drive today, and all seems well. No leaks, and the car ran very cool on a 70 degree afternoon. The fan never turned on until I parked the car after the drive, but I'm sure as summer temperatures arrive, I'll be getting some fan action in traffic. The relocated alternator (Part 80) worked great also. The winter work is done - time to drive!


Nice work all around. Of course, owning a '66 Beetle, I didn't understand any of this, LOL
ReplyDeleteLooks great Emery! Jeff
ReplyDelete