Work has been kind of crazy-making lately (blame Covid-19), so I wanted to make best use of a rare full day in the shop today, plus a couple of hours yesterday. I set these parameters for a quick project:
1. Make something that would be useful in the shop.
2. Finish in about a day or less.
3. Make something that, if I messed it up, would be absolutely inconsequential - I was trying to decrease stress, not increase it!
I decided to work on a good mounting system for a vise on my drill press table. Having a machinist's vise on the milling machine has made me appreciate sturdy, flexible work holding. Here's a photo of the table on my Delta drill press - the slots allow you to slide the vise to the correct position under the drill bit:
Unfortunately, the manufacturer of the vise that a friend gave me didn't get the memo, and it didn't remotely line up.
I decided to start with some custom washers to fit the underside of the drill press table. The wide slots had to be bridged, and there was a cast-in rib in the way on either side. In the collage below, here's what's going on:
1. Cut a chunk of 1.25" aluminum rod.
2. After drilling a 5/16" hole through the center, I turned a "nose" to fit the slot, and then parted off a thick washer.
3. That washer base could then be cleaned up and chamfered to keep from cutting a finger.
4. The two washers were mounted together, and the milling machine made a flat to clear that rib.
Once all of that was done, I had the most ridiculously precise washers ever for a drill press table. I could have ground a flat on a couple of store-bought washers in 2 minutes - these took two hours. But I was looking for a project, remember...
I did some careful measurements to ensure the bolt spacing for both the table and the vise, and even made a couple of test pieces from wood to ensure I'd be satisfied. Then it was time to commit to the aluminum plate. First up... move the mill vise out of the way. Sigh... I trammed (aligned) it in the new location, and will probably leave it there to have more room to one side for projects like this. Then, I used some plywood "packing" to lift the plate off the table, and clamped it down. A dial test indicator was used to align it precisely to the motion of the mill table.
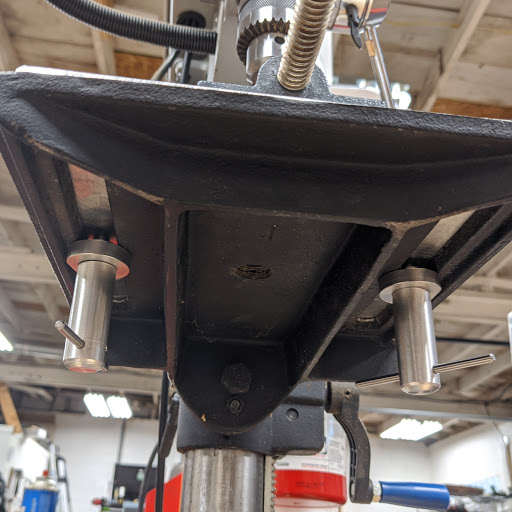
You can see that I made some thick custom washers to hold the vise down also. It's not obvious, but I laid out the holes so that I can rotate the vise 90 degrees should that ever be necessary. In this photo, the plate is held by bolts from underneath, but I decided that would be a pain - I'd have to get a wrench to adjust the vise position, which you do essentially every time you use the drill press. So, I used the same machines and techniques as above to make a nice pair of T-handles. These can be be loosened about a quarter turn by hand, and then the table can easily be moved.
The view from underneath shows how the T-handles hold everything in place, and also shows those fancy custom washers.
Mission accomplished - I had a diverting day in the shop, and got something useful to boot!


No comments:
Post a Comment